How to set up Backstage with GitHub using Typescript & Material UI
In this tutorial, we will explore the hands-on creation of IDP platform using Backstage, leveraging Typescript and Material UI, while customizing the styles.
Introduction
An Internal Developer Platform (IDP) serves as a centralized hub for developers, providing tools, services, and resources to optimize the development process. It offers a unified interface for managing code, documentation, and infrastructure, thereby enhancing team efficiency and collaboration.
So, in this tutorial, we’ll explore the hands-on creation of an IDP platform using Backstage, leveraging TypeScript and Material UI, as outlined below:
1. Local Setup and Launch of Backstage
- Understanding Backstage
- Prerequisites
- Creating Backstage app
- derstanding folder structure
- Launching & Visualizing a Backstage app
2. Customizing Backstage’s Appearance
- Change the name of the app on the main page
- Apply custom Logo
- Customize the look and feel of your App
3. Integrating GitHub Authentication Plugin
- Built-in Authentication Providers
- Integration with GitHub
- Add a sign-in option to the front end for GitHub
Before we dive into the tutorial, let’s briefly understand the significance of TypeScript and Material-UI.
TypeScript
We are using TypeScript because, as a superset of JavaScript, it brings static typing, improving productivity and code quality. Its benefits include:
- Catching errors early in development makes it easier to identify and fix issues.
- Enhancing code readability through clear type definitions for variables and functions.
- Allowing developers to work faster by providing features like auto-completion and type-checking.
Material UI
We chose Material UI because it:
- Provides a uniform look across our platform inspired by Google’s Material Design.
- Offers a rich set of ready-made React components, saving time and reducing errors.
- Adapts beautifully to different devices and screen sizes, improving user experience.
Spotify’s use of Material-UI and TypeScript in building Backstage has established it as a leading choice for IDP frameworks. These tools have contributed to creating a user-friendly platform supported by a strong open-source community, setting new standards for Internal Developer Platforms.
1. Local Setup and Launch of Backstage
a. Understanding Backstage
Before setting up Backstage locally, let’s review its out-of-the-box features. Backstage is an open-source framework for building developer portals powered by a centralized software catalog.
It brings order to your microservices and infrastructure, enabling product teams to ship high-quality code quickly. It consolidates all your infrastructure tools, services, and documentation into a streamlined development environment. Backstage is designed for everyone in the product team, including engineering managers, developers, and platform engineers.
b. Prerequisites
- npm
- Yarn
- Curl
- Wget
- Docker
- git
c. Creating Backstage App
We will install the Backstage standalone app using npx (Node Package Execute).npx is a CLI tool that comes preinstalled with Node.js. It allows you to run commands directly from npm (Node Package Manager) or other registries.
Running the command will create a new directory containing the Backstage app. The CLI wizard will prompt you to enter the app’s name, which will be used to create a subdirectory in your current working directory.
Run the following command:
npx @backstage/create-app@latest
When prompted, enter y.
Enter a name for your IDP app.


This will generate all the necessary files and folder structures inside the directory, allowing you to run your app.
d. General folder structure
Below is a layout of the files and folders generated when creating an app.
app
├── app-config.yaml
├── catalog-info.yaml
├── package.json
└── packages
    ├── app
└── backend- app-config.yaml: The main configuration file for the app, specifying settings and parameters
- catalog-info.yaml: Describes catalog entities for the app, such as components, APIs, resources, and users, defining their metadata and relationships.
- package.json: The root-level package.json file for project metadata and dependencies. Avoid adding npm dependencies here; they should be added to the intended workspace folder.
- packages/: Lerna leaf packages or “workspaces”. Everything here has to be a separate package.
- packages/app/: A fully functioning Backstage frontend app, a starting point for exploring Backstage.
- packages/backend/: Includes backend services for features like Authentication, Software Catalog, Software Templates, and TechDocs.
e.Launching & Visualizing a Backstage app
Your Backstage app is now fully installed and ready to run! Navigate to the application directory and start the app using the yarn dev command. This will run both the front end and back end as separate processes.
yarn devAfter a brief startup period, you should see the following output in your terminal. Once the front end is built, your browser should automatically open to display the app.
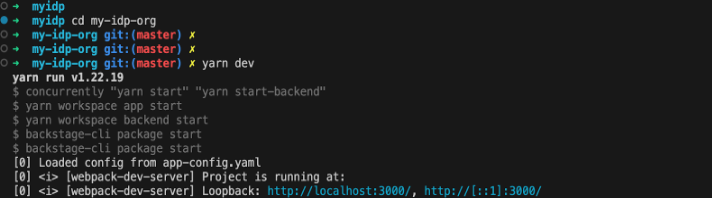
Once the app is up and running, it will be hosted on port 3000. Open any browser and go to http://localhost:3000
2. Customizing Backstage’s Appearance
One of Material-UI’s key advantages is its extensive collection of customizable components and theming options. In this section, we’ll explore how to leverage Material-UI to enhance the user interface of our IDP, from adjusting the color palette to redesigning header and footer components.
a. Change the name of the app on the main page
The first thing you can do is change the app’s name on the main page.
Open app-config.yml and replace the title content with the below:
app:
  title: My Org IDP
  baseUrl: http://localhost:3000
Rerun the application. You should now be able to see the new title.

b. Apply Custom Logo
We will now change the default logo to our custom logo.
1. Place your custom logo under folder packages/app/src/components/Root/logo/
2. Then, under the Root folder, open LogoFull.tsx and replace it with the below code:
	import React from 'react';
	import MyCustomLogoIcon from './logo/idp_logo_icon.png';

	const LogoIcon = () => {
	  return <img width="50" height="50"
	 src={MyCustomLogoIcon} />;
	};
	export default LogoIcon;
3. You can also change the favicon icons under the public folder.

4. Rerun your application to see the changes below.
c. Customize the look and feel of your App.
To customize your Backstage app, you can adjust various elements to fit your branding and design preferences. Here’s an overview of the customization options:
- Custom Theme: Define a custom theme by specifying colors, typography, and other design elements.
- Custom Typography and Fonts: Customize typography settings and integrate custom fonts.
- Custom Logo and Icons: Replace the default logo and icons with custom ones. You can place your logo and icon files in the appropriate directory and reference them in your components.
- Custom Sidebar and Homepage: Modify the relevant components and configuration files to update the sidebar and homepage.
- Overriding Component Styles: Override styles of Backstage or Material-UI components to achieve specific design goals. You can create custom CSS files or use styled-components to apply custom styles.
For detailed instructions and examples on how to implement these customization options, refer to the documentation link provided: Custom Theme – Documentation.
3. Integrating GitHub Authentication Plugin
The authentication system in Backstage serves two distinct purposes: user sign-in and identification and access to third-party resources. It is possible to configure Backstage with multiple authentication providers; however, typically, only one provider is used for sign-in, while the others are used to grant access to external resources.
a. Built-in Authentication Providers
Backstage comes with many common authentication providers in the core library, including:
- Auth0
- Atlassian
- Azure
- Azure Easy Auth
- Bitbucket
- Bitbucket Server
- Cloudflare Access
- GitHub
- GitLab
- Google IAP
- Okta
- OAuth 2 Custom Proxy
- OneLogin
- VMware Cloud
These built-in providers can handle the authentication flow for specific services, including required scopes, callbacks, etc. Each provider is added similarly to a Backstage app.Without proper authentication, your organization’s IDP platform lacks crucial functionality. Integrating GitHub authentication enhances security by ensuring only authorized users can access the platform. It also improves usability by allowing developers to use their existing GitHub credentials for seamless login.
b. Integration with GitHub
Integrating GitHub with Backstage enables developers to seamlessly access and manage their repositories within the IDP. In this section, we’ll set up GitHub authentication and configure the necessary plugins to enable GitHub integration in Backstage.
Now, go to your GitHub account settings for OAuth App creation.
The homepage URL should be pointing to the Backstage’s front end; it should be on your http://localhost:3000.
The Authorization callback URL will point to the auth backend, which will most likely be http://localhost:7007/api/auth/github/handler/frame

Once you click on the Register Application Button, the page should refresh, and you should be able to see the Client ID.
Then click on Generate a new client secret Button:

Copy the Client ID and the Client Secret.
Now, in the app folder structure, Open app-config.yaml, and add your clientId and clientSecret to this file. It should end up looking like this

c. Add sign-in option to the front-end for GitHub
Backstage will re-read the configuration. If there are no errors, you can proceed to the final configuration step: changing the sign-in page.
To update the sign-in page, open packages/app/src/App.tsx and below the last import line, add the import:
import { githubAuthApiRef } from '@backstage/core-plugin-api';
import { SignInPage } from '@backstage/core-components';
Now, in the same file, search for const app = createApp, and add:
components: {
 SignInPage: props => (
      <SignInPage
        {...props}
        auto
        provider={{
          id: 'github-auth-provider',
          title: 'GitHub',
          message: 'Sign in using GitHub',
          apiRef: githubAuthApiRef,
        }}
      />
    ),

Restart the application from the terminal by stopping it with Ctrl+C and starting with yarn dev. Now, you should be welcomed by a login prompt!
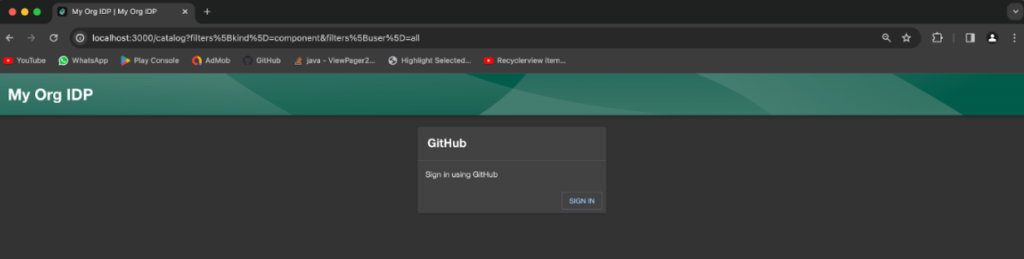
Once you click the Sign IN button, see the page below.
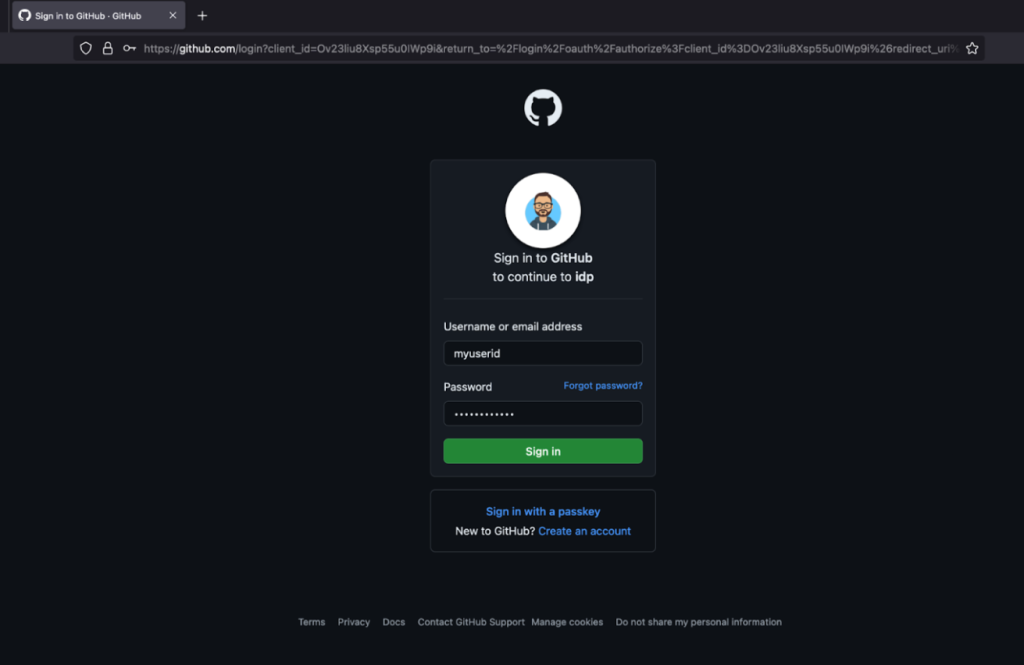
⇒ Click on Sign In, and on the next screen, you can click on Authorize.

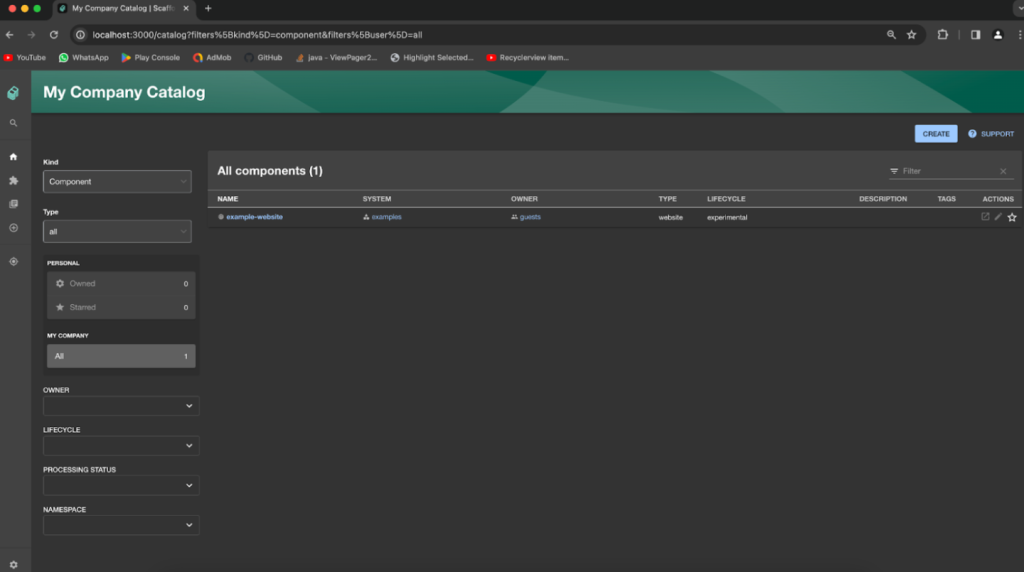
At this point you should have a complete setup of GitHub with Backstage, and can configure services in the Service Catalog.
References
Here is the github repo, which contains all the changes mentioned in this tutorial.