Choosing Between Pull vs. Push-Based GitOps
Learn about the two approaches to GitOps - push and pull - and how to implement them, their differences, benefits, and commonly used tools for each approach.
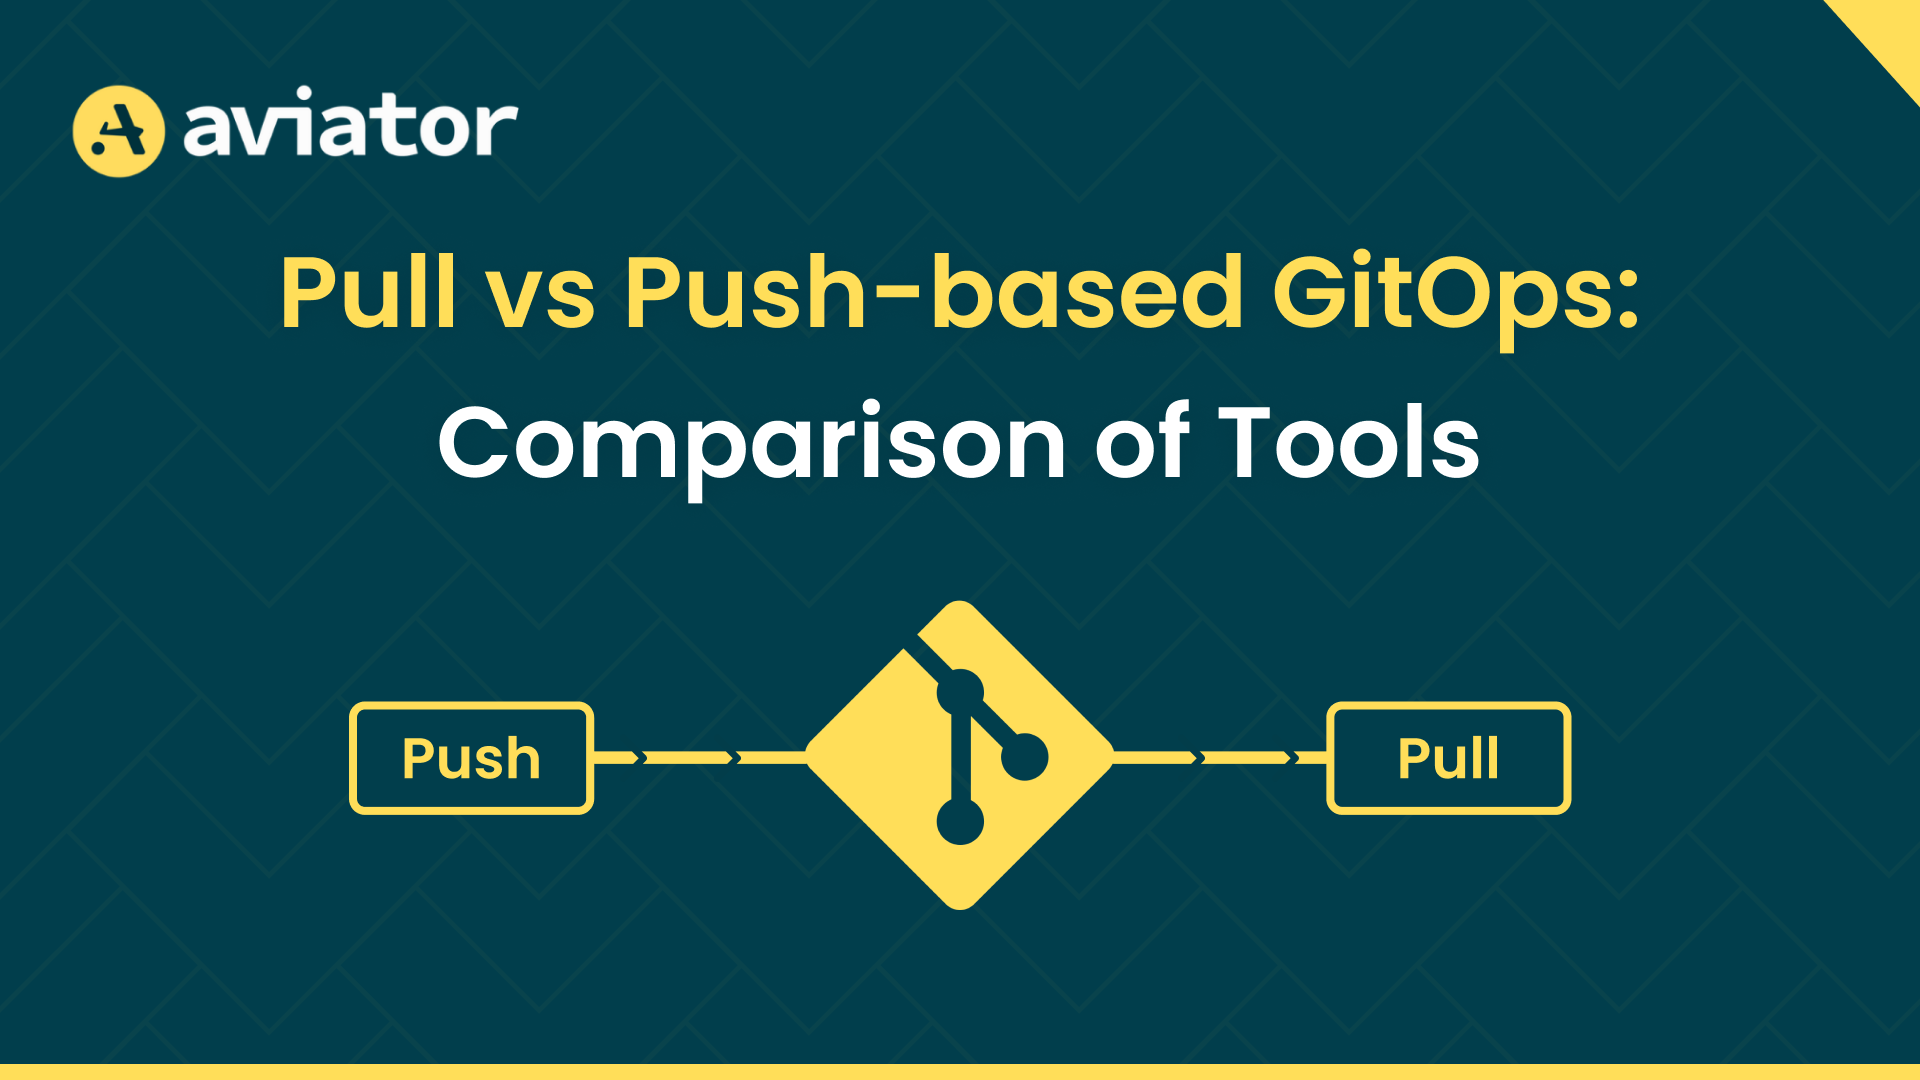
GitOps has become essential in cloud-native deployments, particularly with Kubernetes. This article dives into the two primary GitOps approaches—push and pull—exploring their architectures, tools, and best use cases.
What is GitOps?
At its core, GitOps leverages Git as a single source of truth for defining and managing your infrastructure and application deployment. It bridges the gap between development and operations using Git repositories as the primary deployment control mechanism. Changes to your system are made by updating your Git repository, with automation tools applying these updates to your environment.
How does GitOps Work?
GitOps can be implemented using two main approaches: push and pull. In the push approach, CI/CD tools directly send changes from the Git repository to the environment. On the other hand, the pull approach uses GitOps operators to fetch changes from the repository and apply them to the environment.
Push-Based GitOps
The push-based approach in GitOps is akin to the traditional CI/CD pipelines. In this model, a CI/CD tool actively pushes changes from the Git repository to the target environment. This method gives you more control over the deployment process but requires more setup and maintenance.
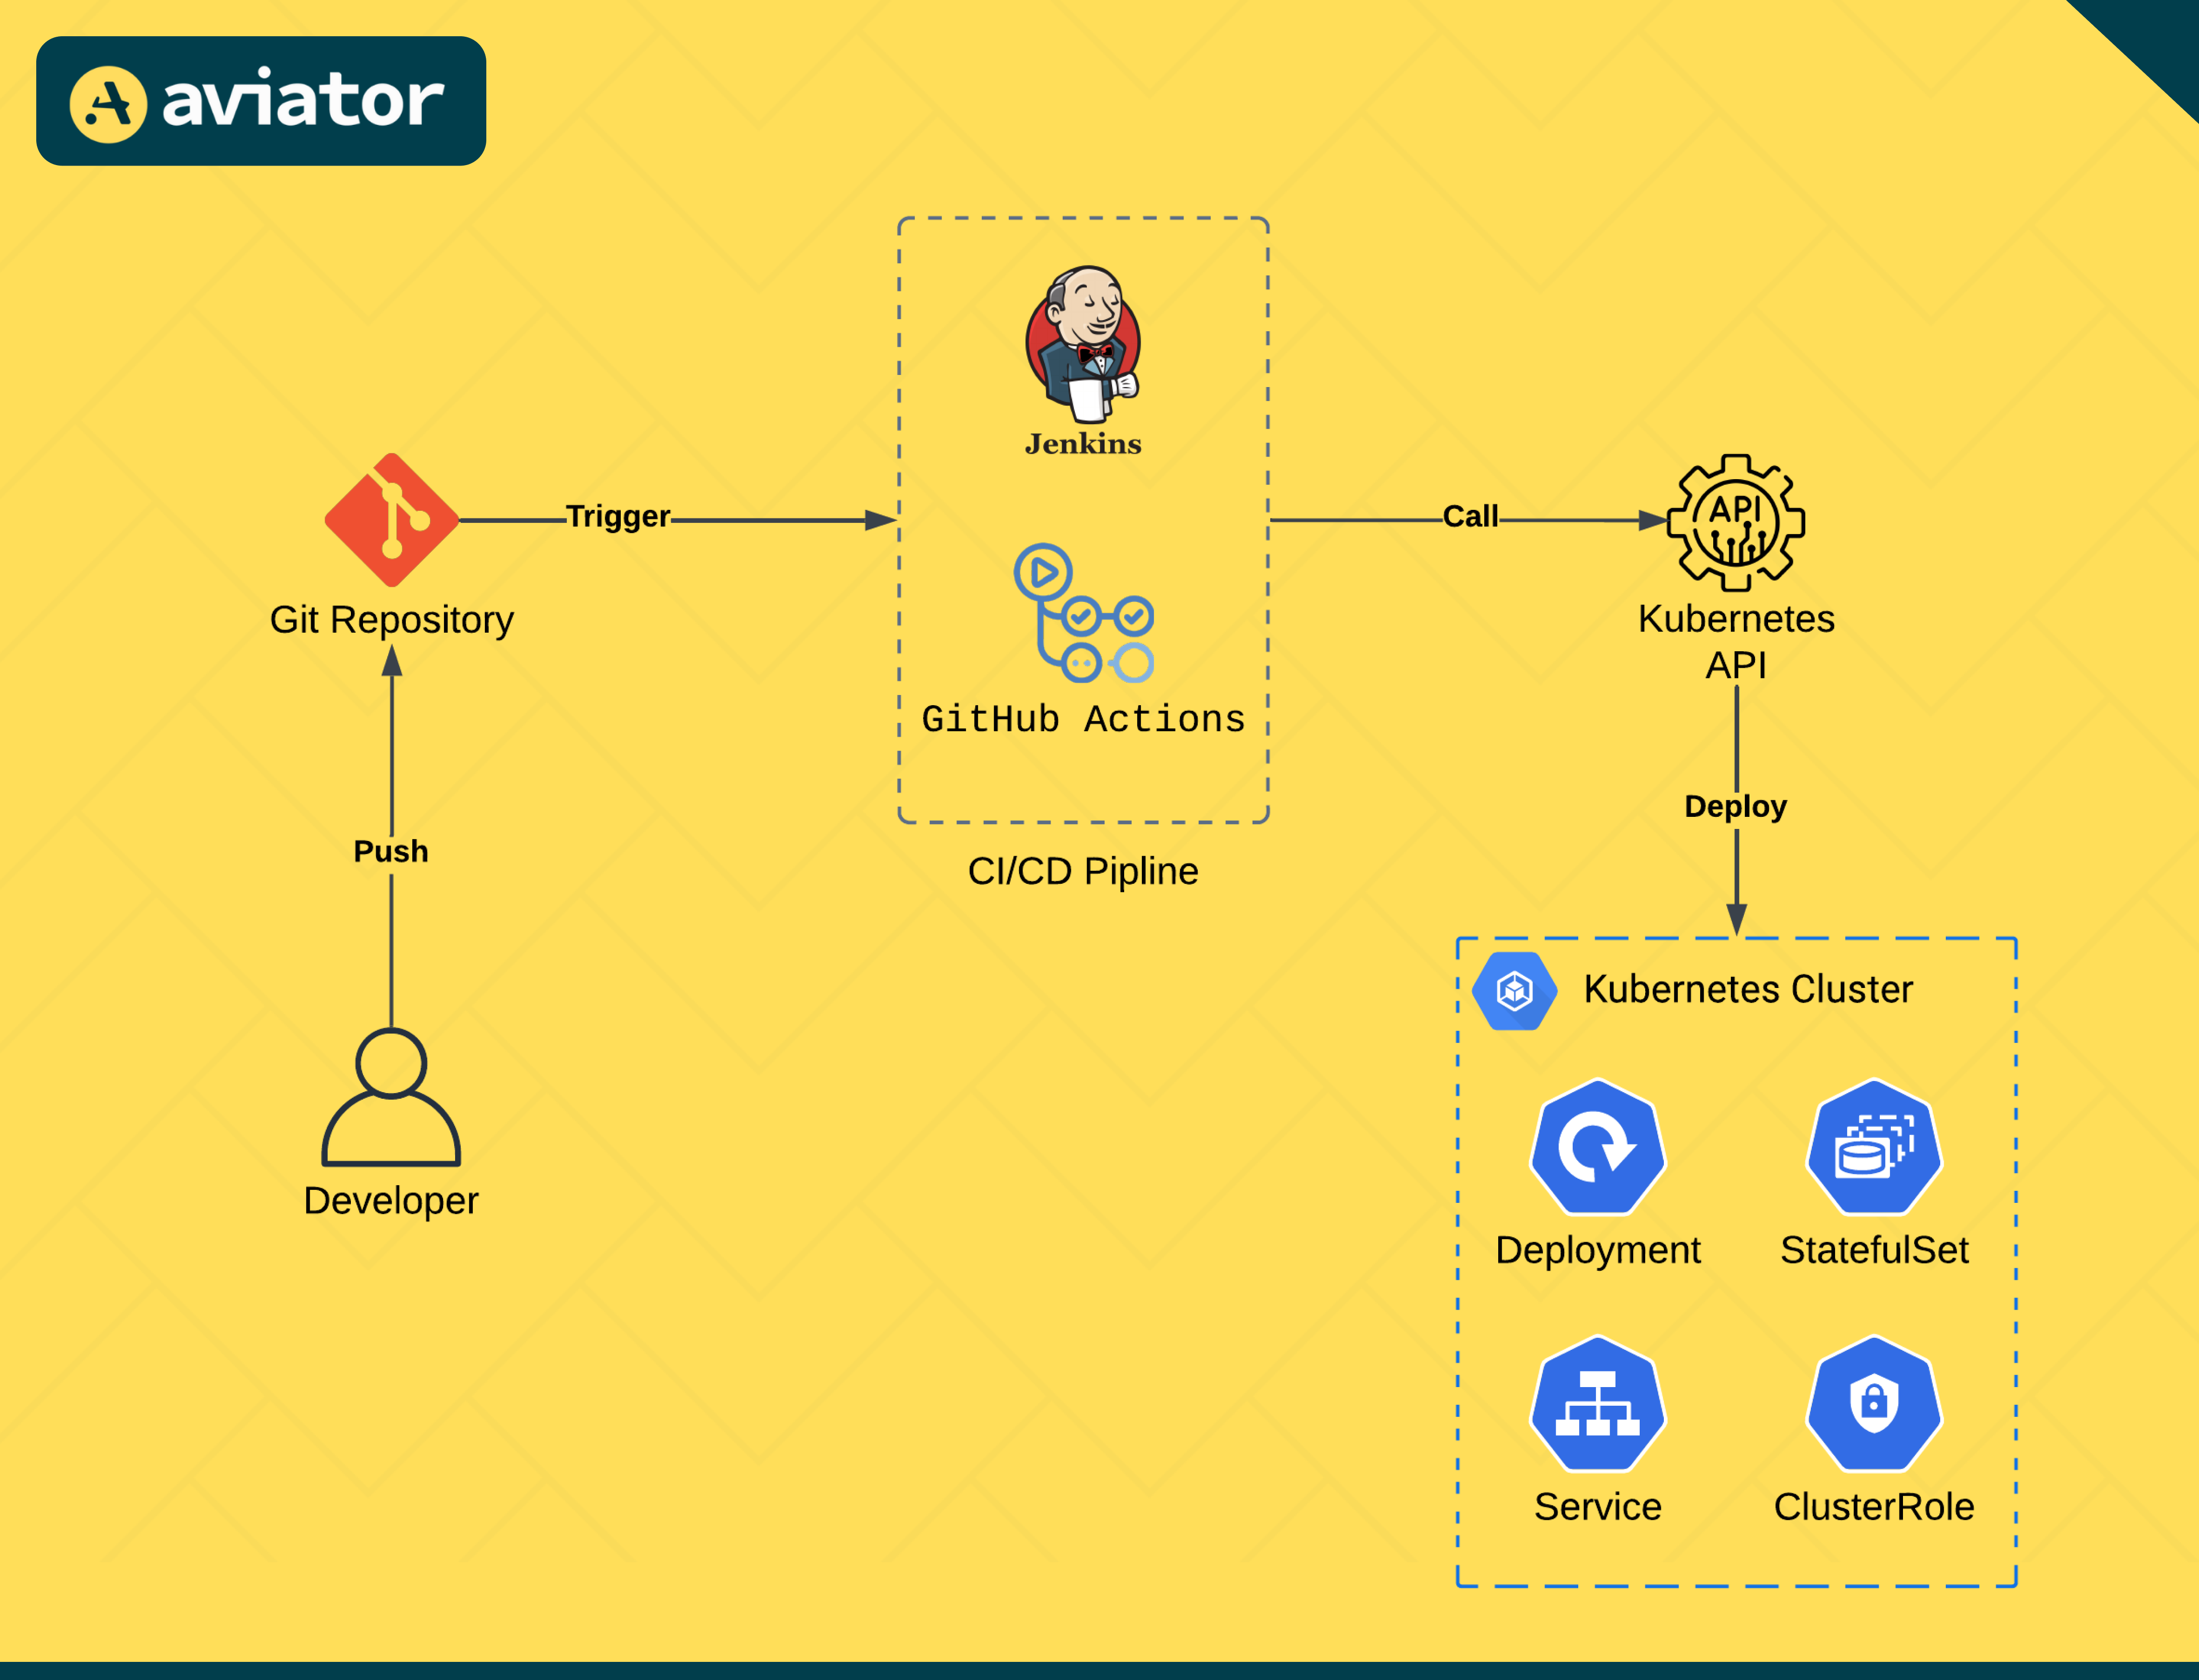
Popular tools for push-based GitOps include Jenkins, GitHub Actions, GitLab CI/CD, CircleCI, and Buildkite.
Jenkins vs. GitHub Actions
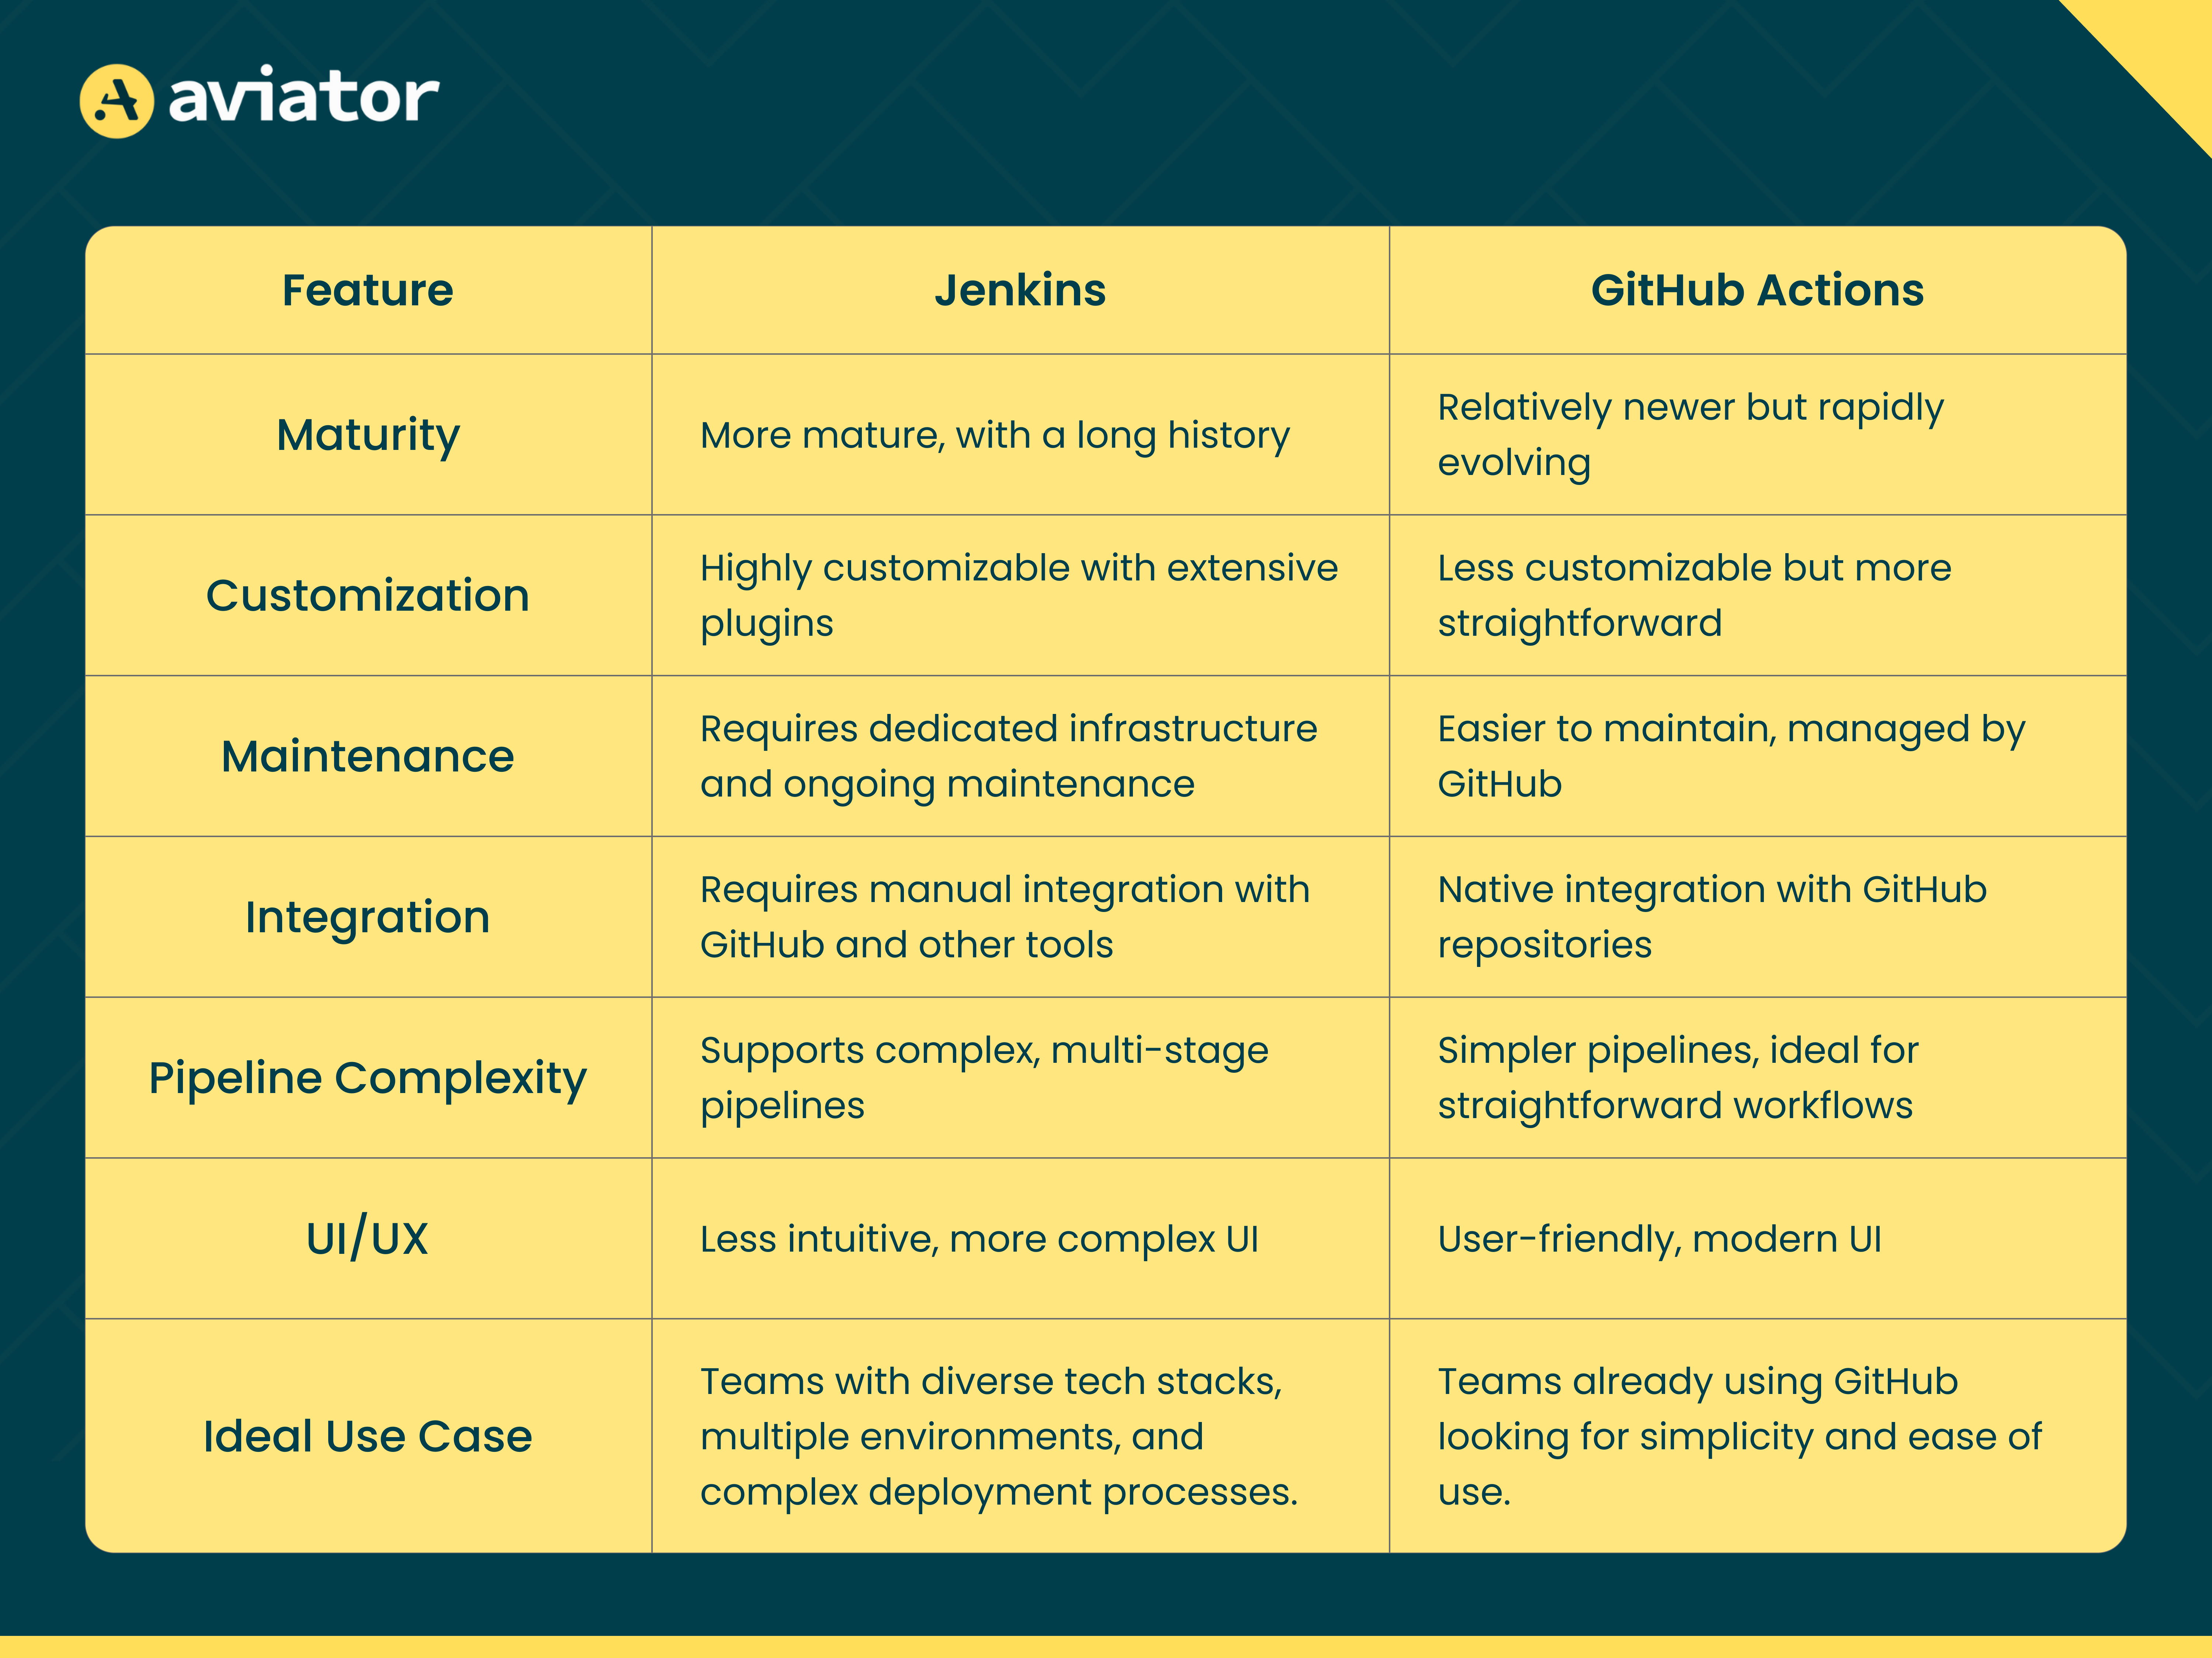
Jenkins offers extensive customization and complex pipeline support but requires dedicated infrastructure. GitHub Actions provides easy setup, a better UI, and a seamless GitHub repository integration, making it ideal for GitHub users, though with less deep customization.
Below is a comparison table highlighting the key differences between the two tools:
Implementation with GitHub Actions
Consider a microservices architecture with multiple applications. You can set up a GitHub Actions workflow that triggers on every push to the main branch. For example, this workflow can:
- Run unit and integration tests.
- Build Docker images for your services.
- Push the images to a container registry.
- Deploy the updated images to your Kubernetes cluster using kubectl commands.
This straightforward approach works well for teams already using GitHub for source control.
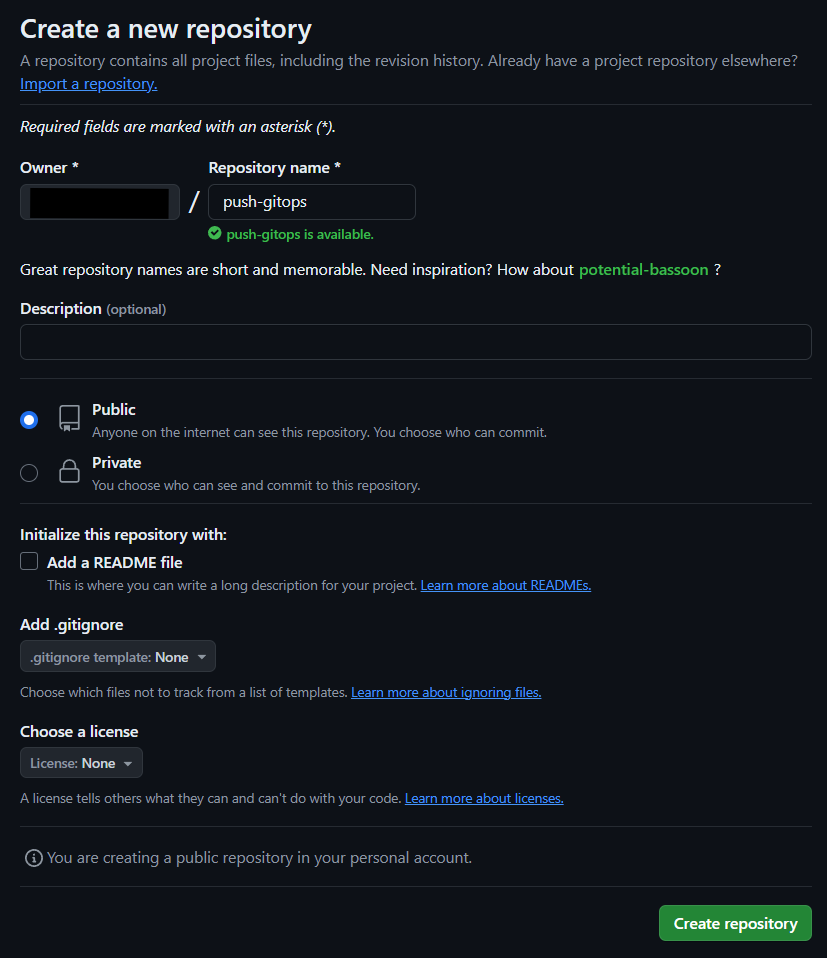
This tutorial will use Azure AKS as the managed Kubernetes cluster. Let us start by creating a repository in GitHub.
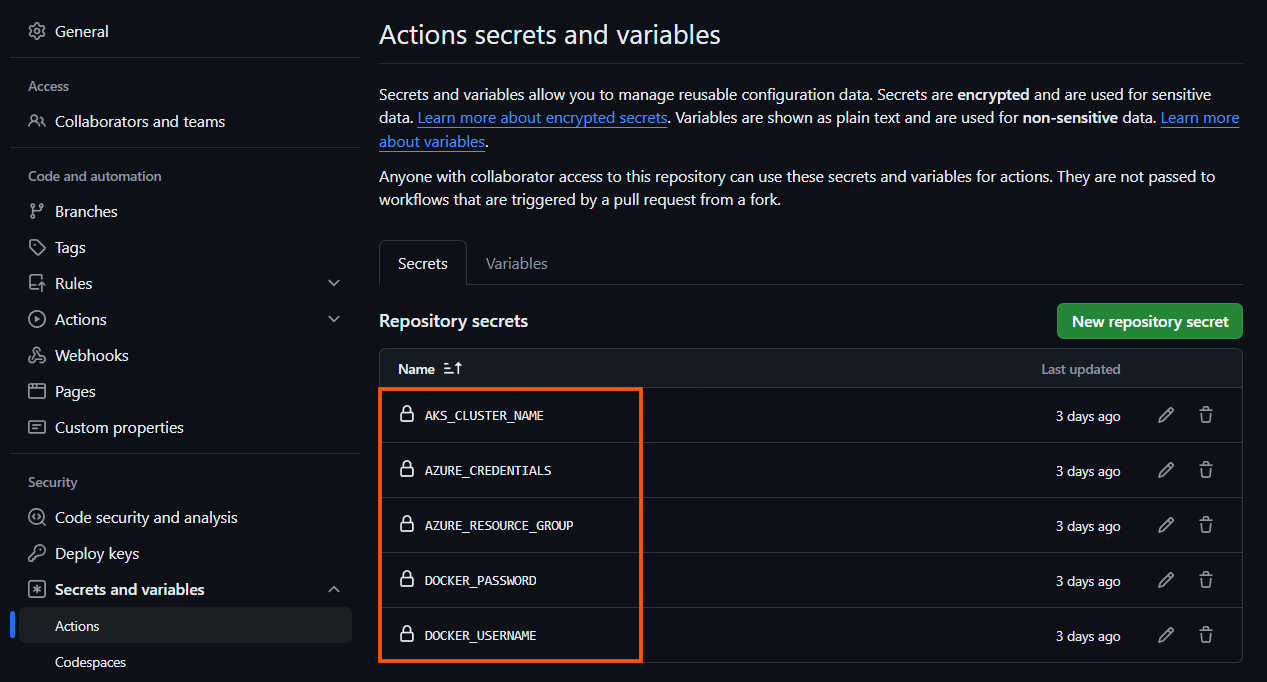
Add the Azure and Docker secrets required for the pipeline to access the platforms.
Now, create an application server locally. We are using an Express server in app.js for this tutorial.
const express = require('express')
const app = express()
const port = 3000app.get('/', (req, res) => {
  res.send('This is an app for Push-based GitOps!')
})app.listen(port, () => {
  console.log(`Example app listening on port ${port}`)
})
Create a Dockerfile to containerize the application.
FROM node:latest
WORKDIR /usr/src/app
COPY package*.json ./
RUN npm install
COPY . .
EXPOSE 3000
CMD ["node", "app.js"]
Add the following pipeline code in .github/workflows/pipeline.yaml.
name: CI/CD Pipelineon:
  push:
    branches:
      - mainjobs:
  build:
    runs-on: ubuntu-latest    steps:
    - name: Checkout code
      uses: actions/checkout@v3    - name: Set up Docker Buildx
      uses: docker/setup-buildx-action@v3    - name: Log in to Docker Hub
      uses: docker/login-action@v3
      with:
        username: ${{ secrets.DOCKER_USERNAME }}
        password: ${{ secrets.DOCKER_PASSWORD }}    - name: Build and push Docker image
      uses: docker/build-push-action@v5
      with:
        context: .
        push: true
        tags: ${{ secrets.DOCKER_USERNAME }}/push-gitops:latest  deploy:
    runs-on: ubuntu-latest
    needs: build    steps:
    - name: Checkout code
      uses: actions/checkout@v3    - name: Set up Kubectl
      uses: azure/setup-kubectl@v3
      with:
        version: 'latest'    - name: Azure Login
      uses: azure/login@v1
      with:
        creds: ${{ secrets.AZURE_CREDENTIALS }}    - name: Set up AKS context
      run: az aks get-credentials --resource-group ${{ secrets.AZURE_RESOURCE_GROUP }} --name ${{ secrets.AKS_CLUSTER_NAME }}    - name: Deploy to AKS
      run: kubectl apply -f k8s
The above pipeline creates a docker image of the code, pushes it to DockerHub, and finally deploys the kubernetes manifest files in the cluster on every code push to the main branch.
Create a Kubernetes manifest file in k8s/deploy.yaml to deploy the containerized application in the Kubernetes cluster.
apiVersion: v1
kind: Service
metadata:
  name: push-svc
spec:
  selector:
    name: push-pod
  type: LoadBalancer
  ports:
    - protocol: TCP
      port: 3000
      targetPort: 3000
---
apiVersion: apps/v1
kind: Deployment
metadata:
  name: push-deploy
  labels:
    name: push-deploy
spec:
  replicas: 2
  selector:
    matchLabels:
      name: push-pod
  template:
    metadata:
      labels:
        name: push-pod
    spec:
      containers:
        - name: push-container
          image: <your-docker-username>/push-gitops:latest
          ports:
            - containerPort: 3000
Finally, create .gitignore and .dockerignore files and add the node_modules directory to avoid large file transfers to the repository and the container.
After completing all the above steps, initialize a local git repository for the project, commit the changes, create the “main” branch locally, and push the code on your remote repository.
git init
git commit -m "push-gitops"
git branch -M main
git remote add origin <your-remote-repository-url>
git push -u origin main
Verify the pipelines are successfully executed in the actions tab in GitHub.

Get the external IP of the “push-svc” service created on the cluster to verify the application deployment.

Enter the external IP of the service in the browser with the port to verify the application.

Pull-Based GitOps
In a pull-based GitOps model, a GitOps operator (e.g., FluxCD or ArgoCD) running within your environment that continuously checks the Git repository for changes. When a change is detected, the operator pulls these changes and applies them to the environment.
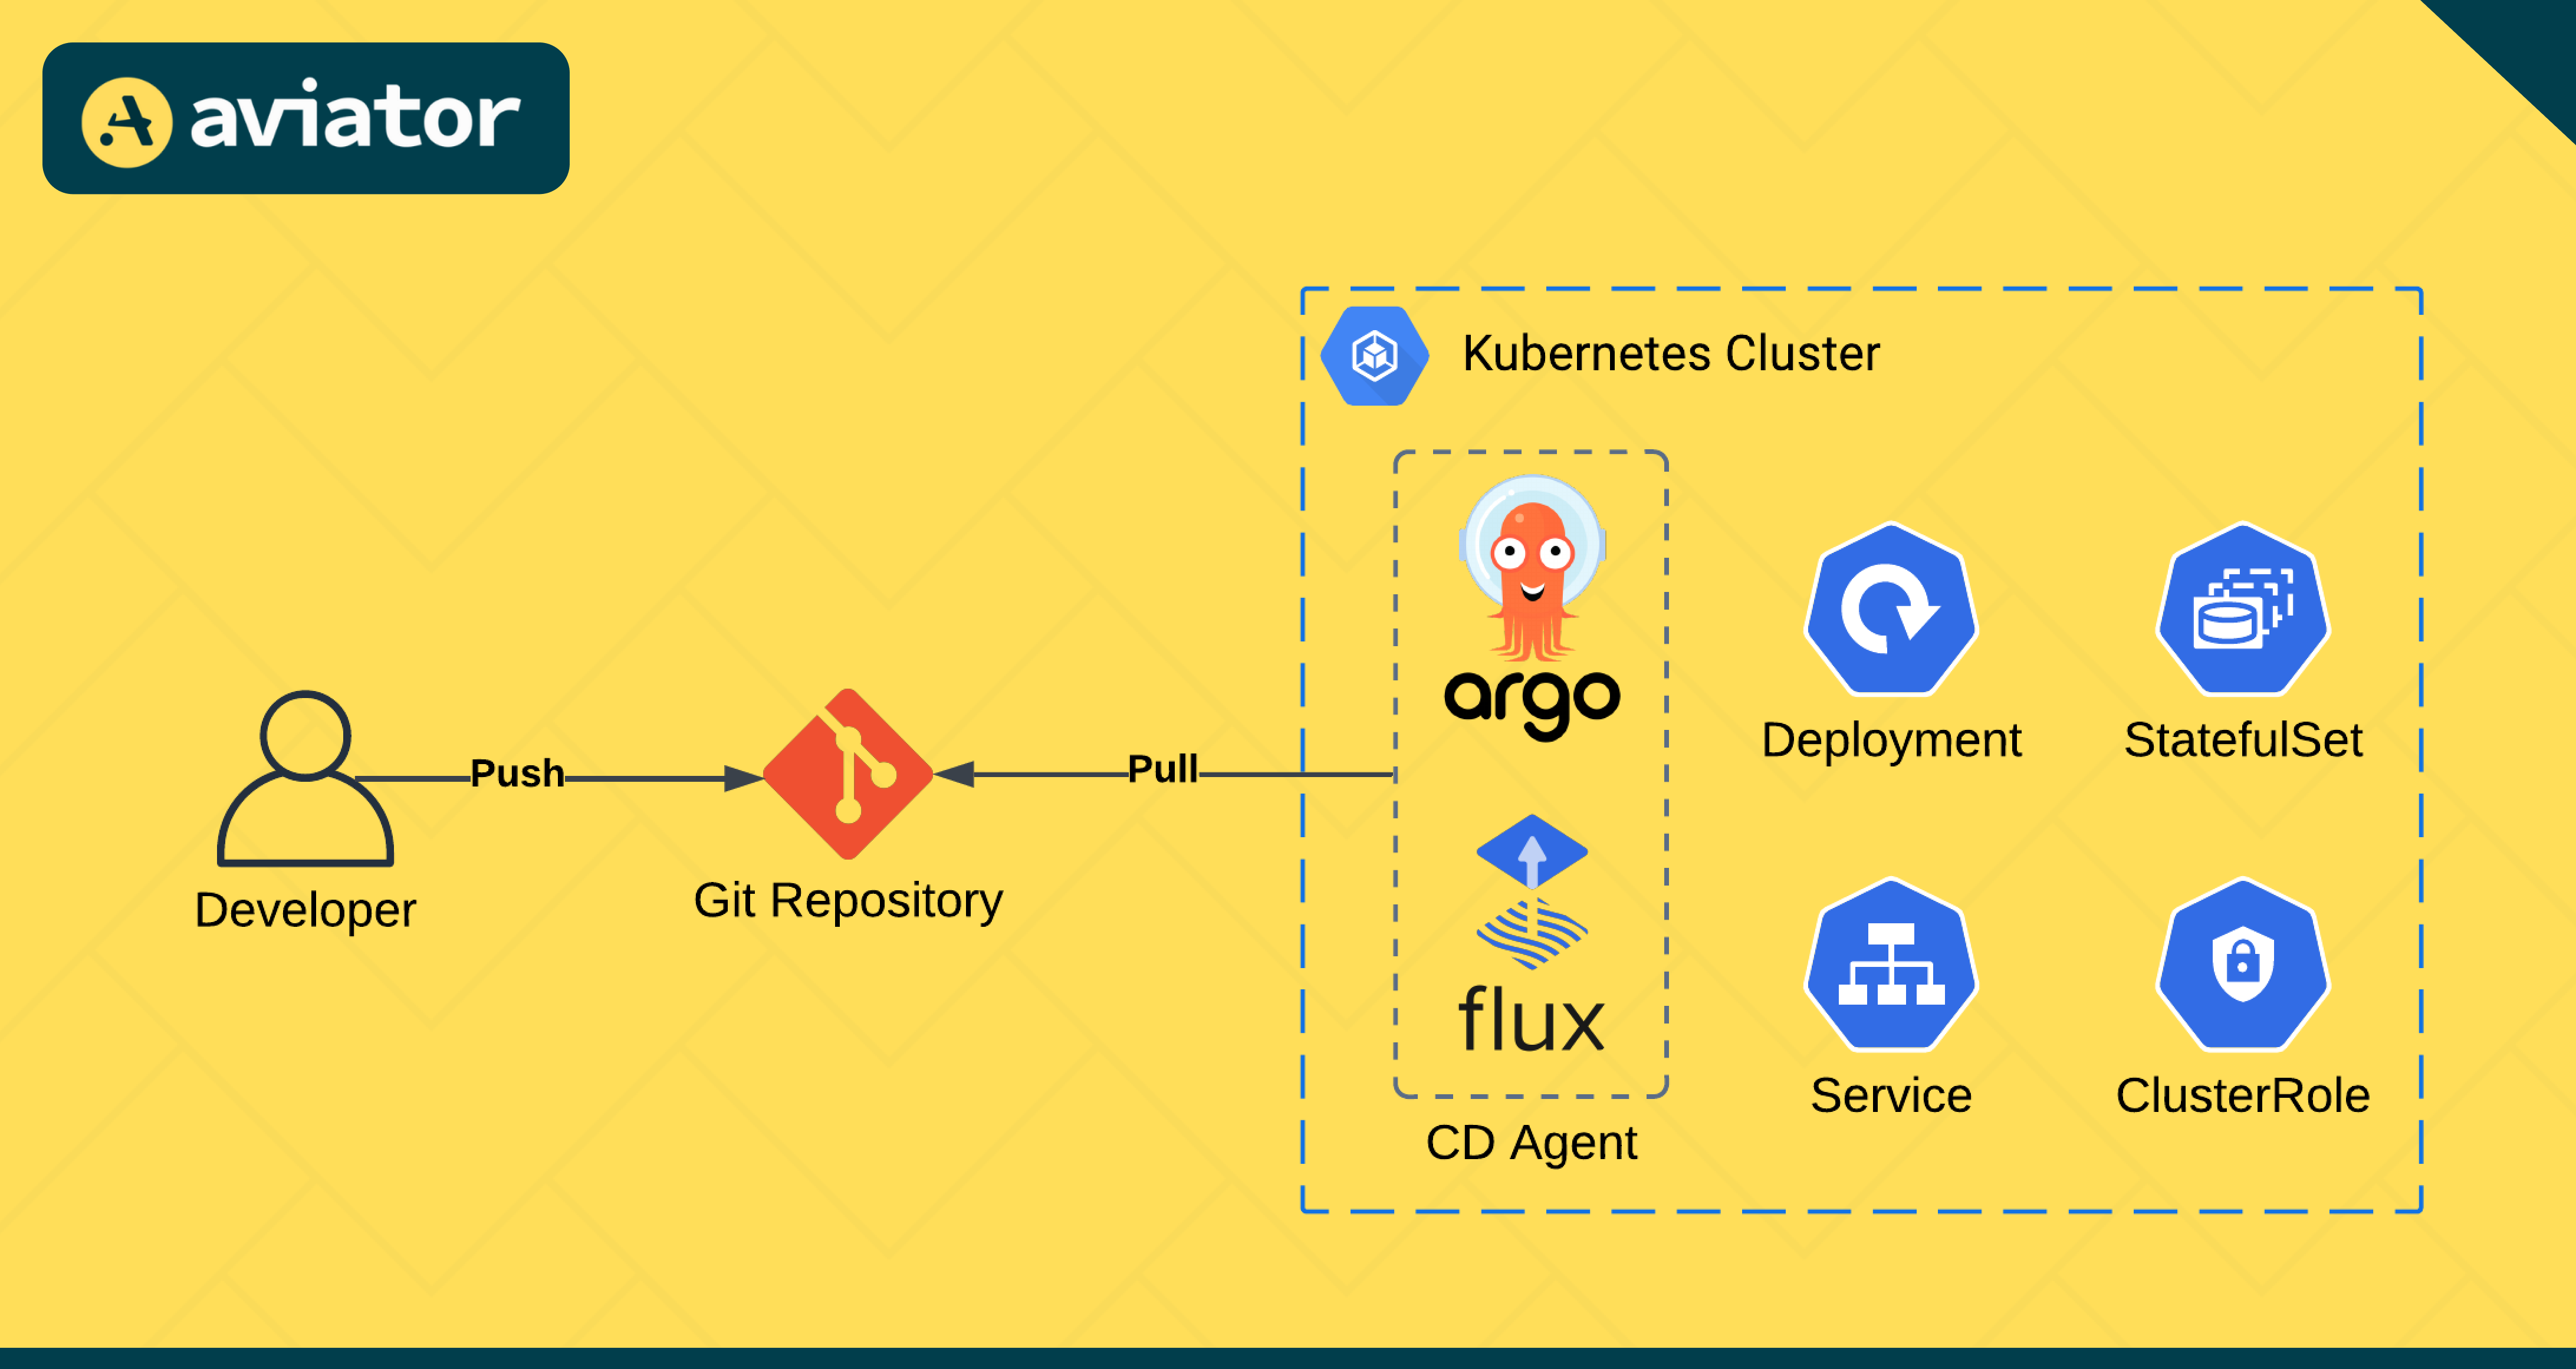
FluxCD vs ArgoCD
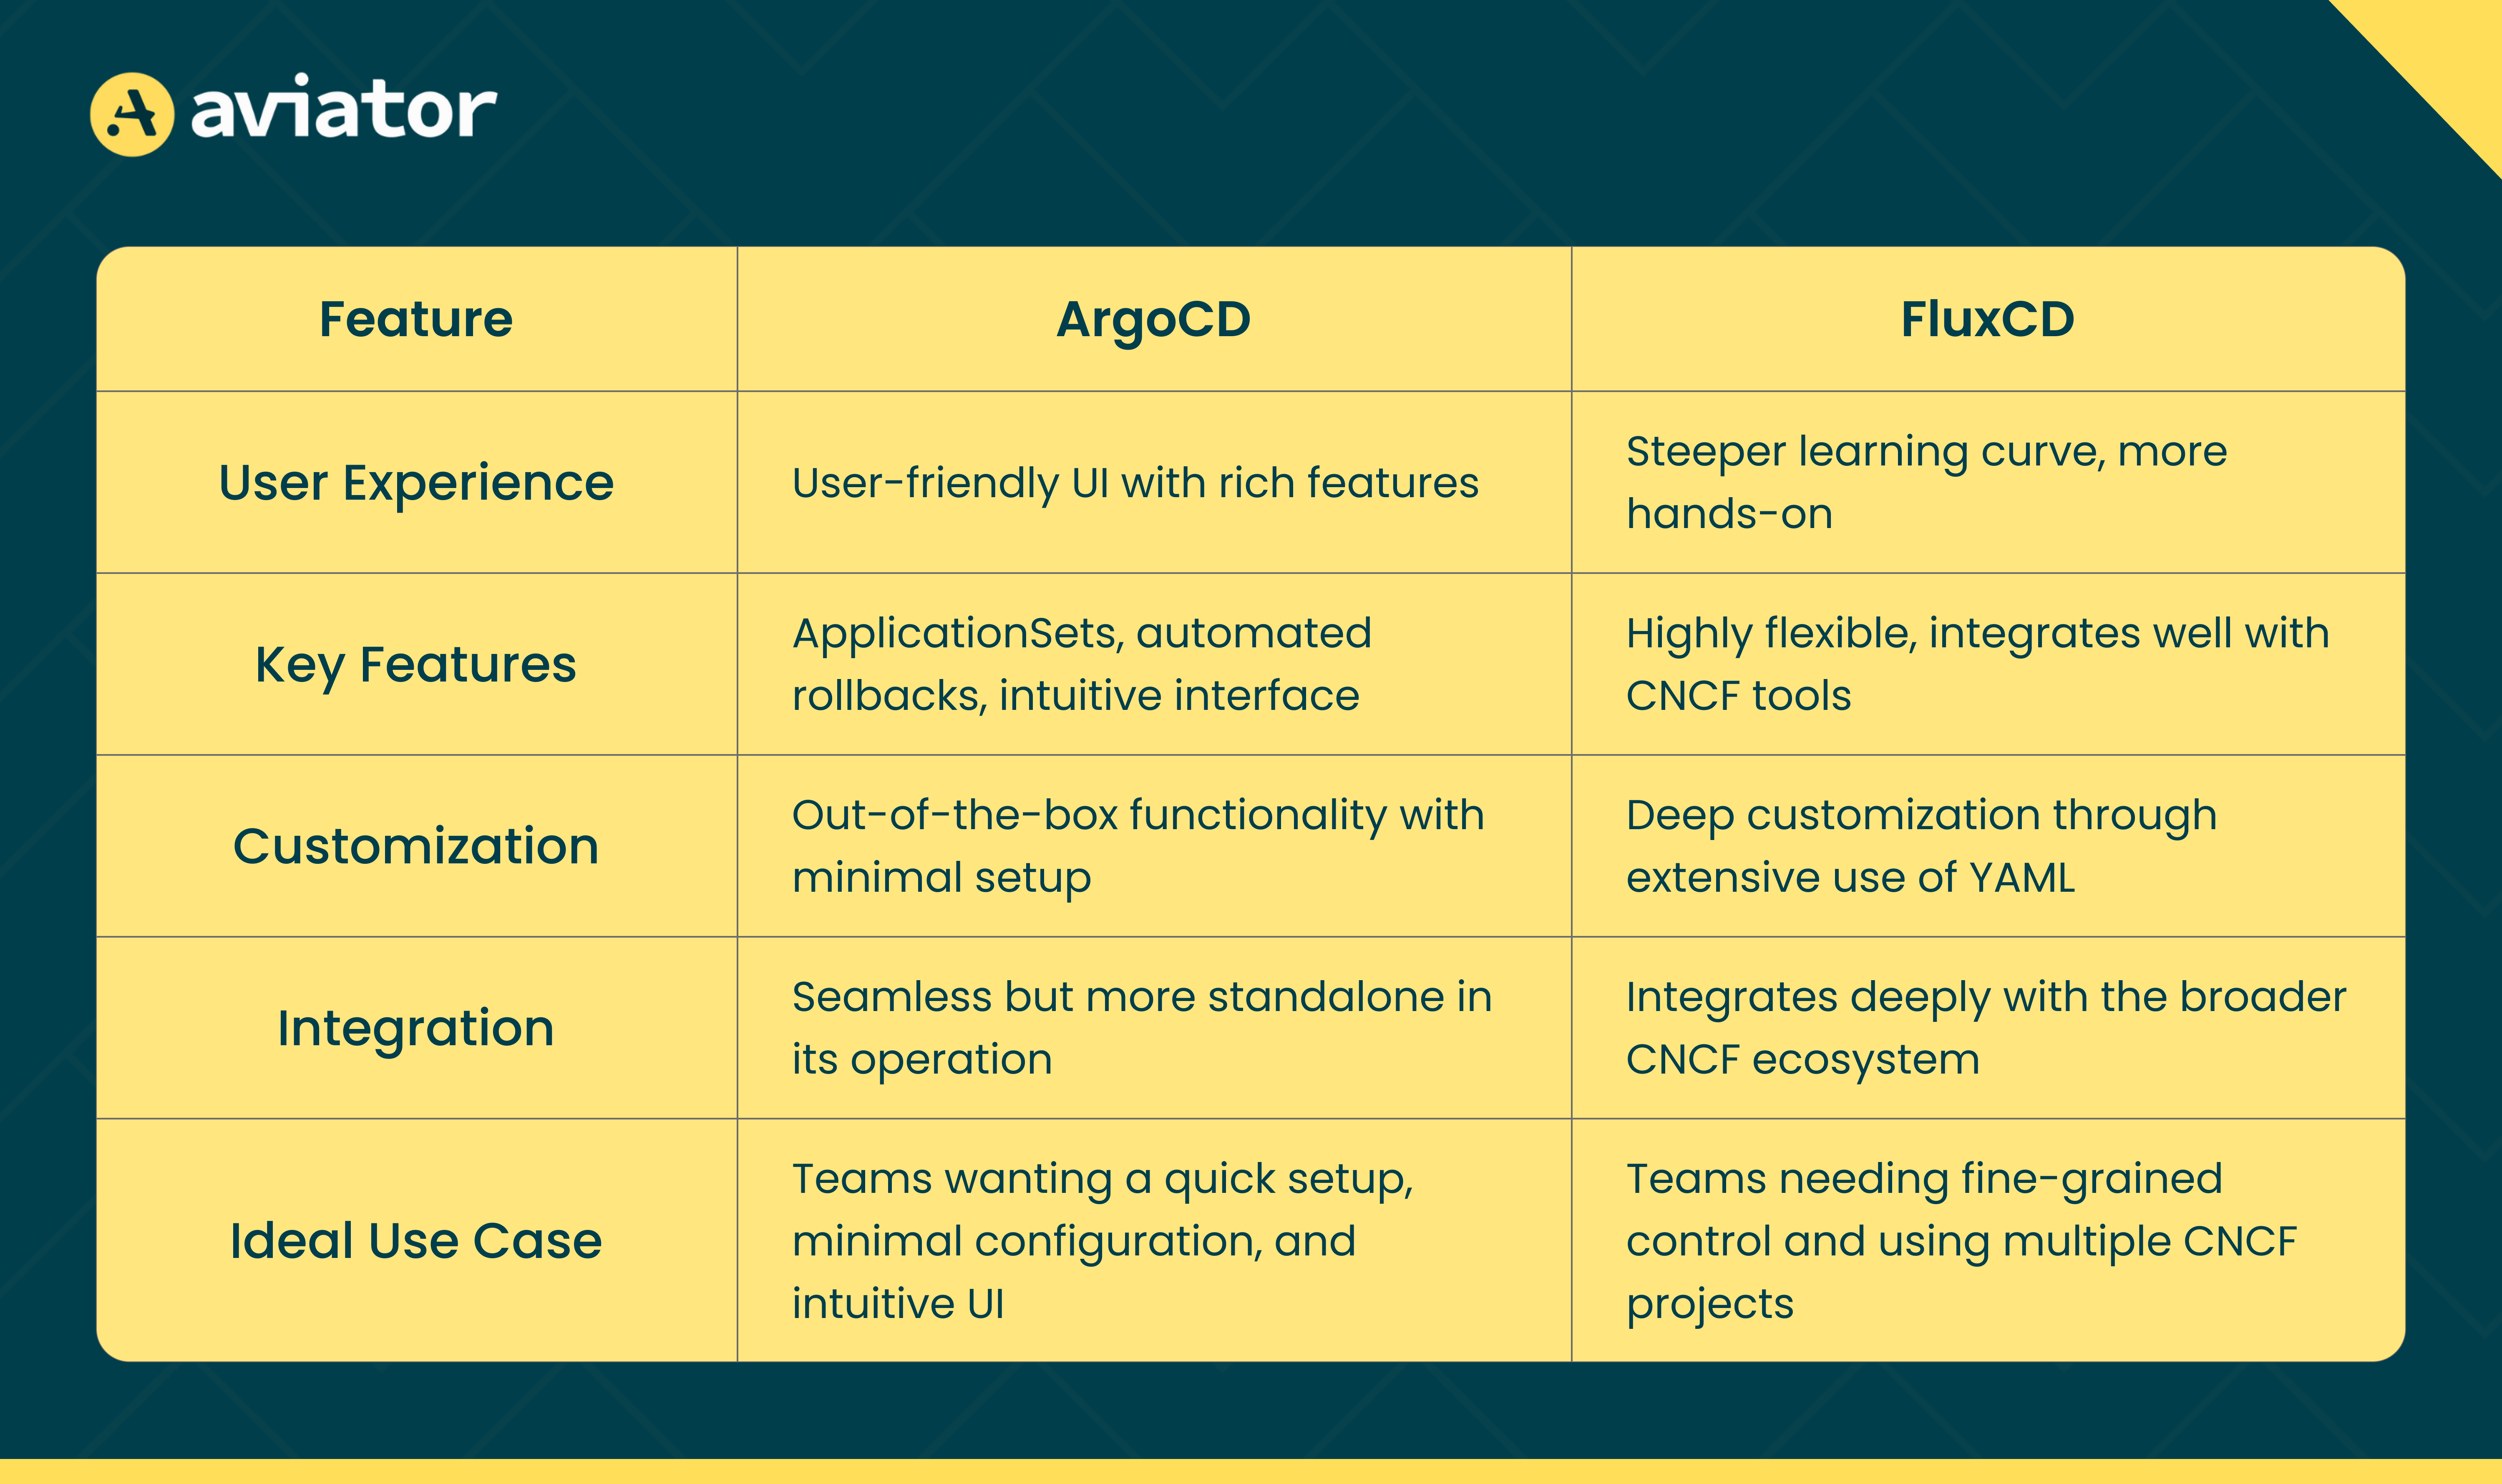
FluxCD and ArgoCD differ mainly in user experience, customization, and integration. ArgoCD provides a polished UI and features like ApplicationSets and automated rollbacks, which are ideal for ease of use. FluxCD, though more complex, is a more flexible and modular approach, making it suited for teams needing advanced customization.
Here’s a table summarizing these differences:
Implementation with ArgoCD
After setting up ArgoCD in your Kubernetes cluster, you can connect it to your Git repository. ArgoCD monitors the repository for any changes to the manifest files, and synchronizes the application with the desired state defined in Git.
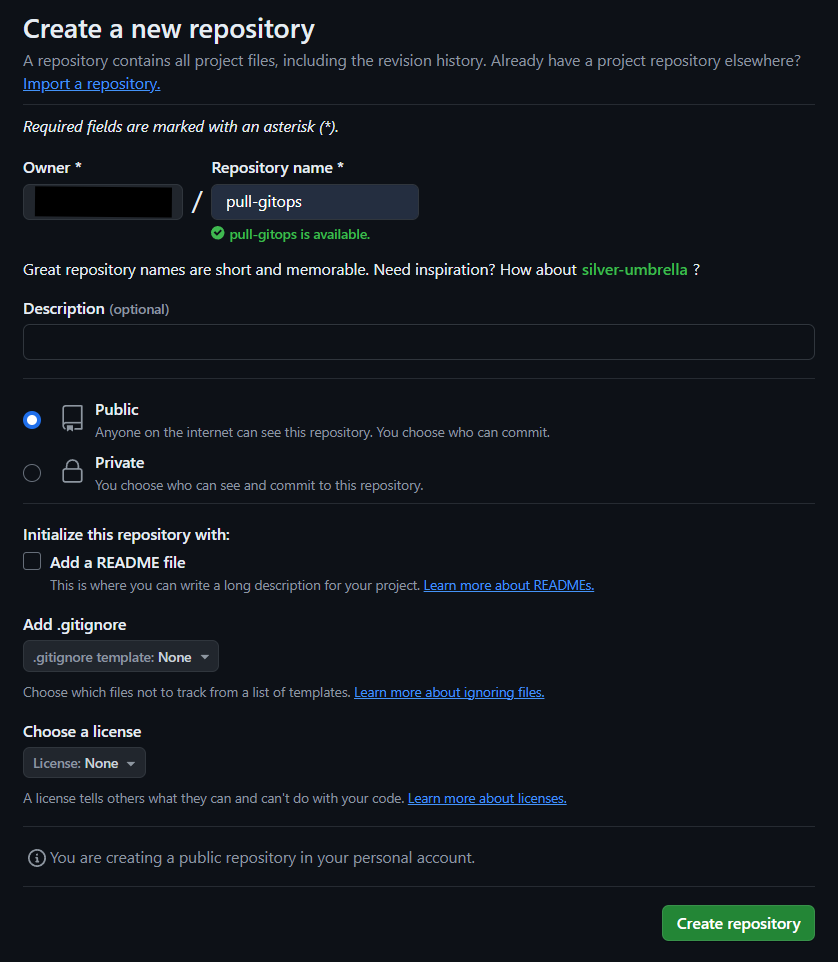
Let us create a new repository on GitHub.
Set up ArgoCD on your Kubernetes Cluster using their Getting Started guide and create an ArgcoCD deployment pipeline.
apiVersion: argoproj.io/v1alpha1
kind: Application
metadata:
  name: argo-pipeline
  namespace: argocdspec:
  project: default
  source:
    repoURL: <your-git-repository>
    targetRevision: HEAD
    path: k8s
  destination:
    server: https://kubernetes.default.svc
    namespace: pull-gitops
  syncPolicy:
    syncOptions:
    - CreateNamespace=true
    automated:
      prune: true
This pipeline gets triggered whenever there is a difference between the manifest files in the k8s directory of the remote repository and the actual state of the cluster. It brings the actual state of the cluster as configured in the manifest files of the k8s directory. Apply this pipeline in the Kubernetes cluster.
Copy all the files except node_modules we made in the push-based approach to the pull-based approach.
Change the .github/workflows/pipeline.yaml with the following code:
name: CI Pipelineon:
  push:
    branches:
      - main
    paths-ignore:
      - 'k8s'jobs:
  build:
    runs-on: ubuntu-latest    steps:
    - name: Checkout code
      uses: actions/checkout@v3    - name: Set up Docker Buildx
      uses: docker/setup-buildx-action@v3    - name: Log in to Docker Hub
      uses: docker/login-action@v3
      with:
        username: ${{ secrets.DOCKER_USERNAME }}
        password: ${{ secrets.DOCKER_PASSWORD }}    - name: Build and push Docker image
      uses: docker/build-push-action@v5
      with:
        context: .
        push: true
        tags: ${{ secrets.DOCKER_USERNAME }}/pull-gitops:${{ github.sha }}  deploy:
    runs-on: ubuntu-latest
    needs: build    steps:
      - name: Checkout repository
        uses: actions/checkout@v4
      - name: Update deployment.yaml
        run: |
          sed -E -i "s/<your-github-username>/pull-git[a-zA-Z0-9:/-]+/<your-github-username>/pull-gitops:${{ github.sha }}/g" k8s/deploy.yaml      - name: Stage changes
        run: git add k8s/deploy.yaml      - name: Set Git user identity
        run: |
          git config --global user.email "<your-github-email>"
          git config --global user.name "<your-github-username>"      - name: Commit changes
        run: git commit -m "Update k8s manifest" k8s/deploy.yaml      - name: Push changes
        uses: ad-m/github-push-action@master
        with:
          github_token: ${{ secrets.GIT_TOKEN }}
          branch: main
The above yaml is just for continuous integration, which builds a docker image with a unique image tag and updates the k8s directory with a new docker image for the ArgoCD pipeline to get triggered.
Change the app.js response to identify the server deployed using the pull-based approach.
const express = require('express')
const app = express()
const port = 3000app.get('/', (req, res) => {
  res.send('This is an app for Pull-based GitOps!')
})app.listen(port, () => {
  console.log(`Example app listening on port ${port}`)
})
Leave the remaining files similar to the push-based approach.
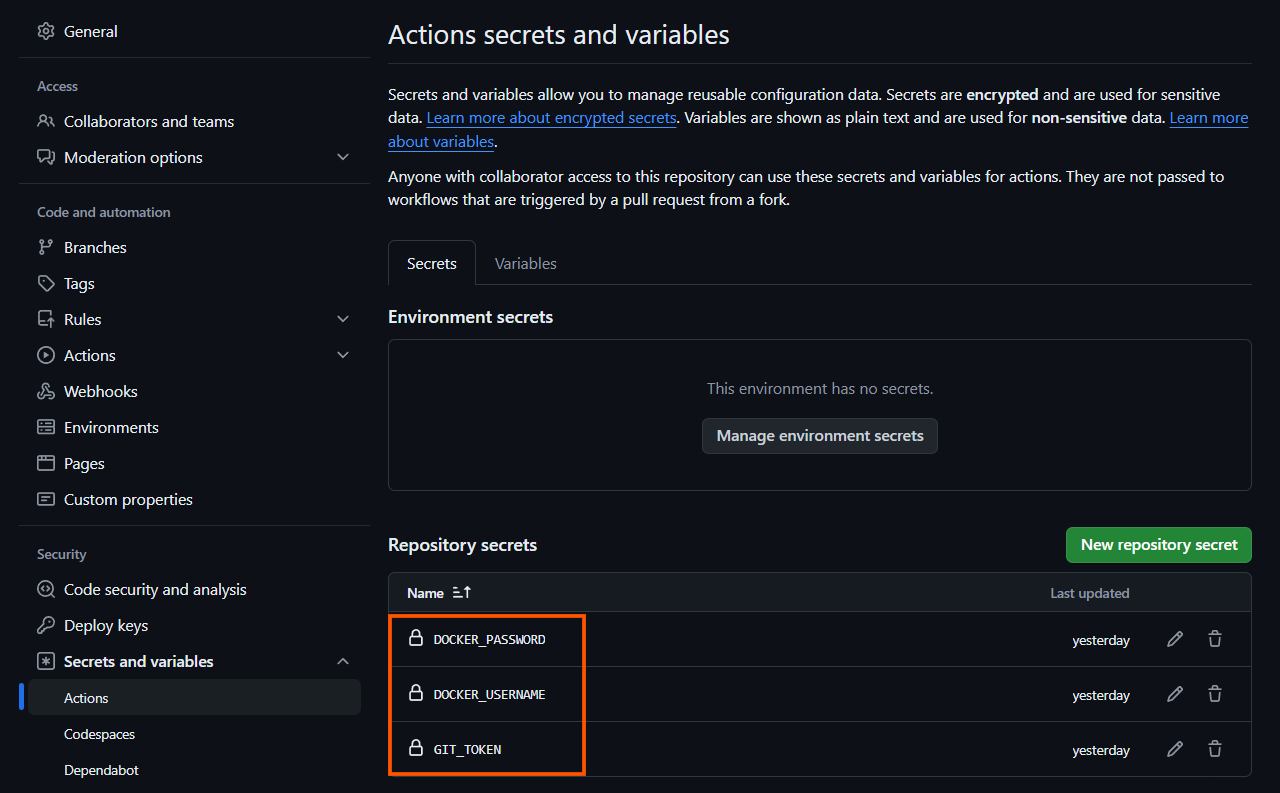
We don’t need the credentials of the Kubernetes cluster in GitHub for this approach. Just create a personal access token with the repository level access and add it as a secret.
After completing all the above steps, initialize a local git repository for the project, commit the changes, create the “main” branch locally, and push the code on your remote repository.
git init
git commit -m "pull-gitops"
git branch -M main
git remote add origin <your-remote-repository-url>
git push -u origin main
Verify that the pipeline is successfully executed.

Go to the ArgoCD Web UI and verify that that pipeline is in sync with the latest commits.
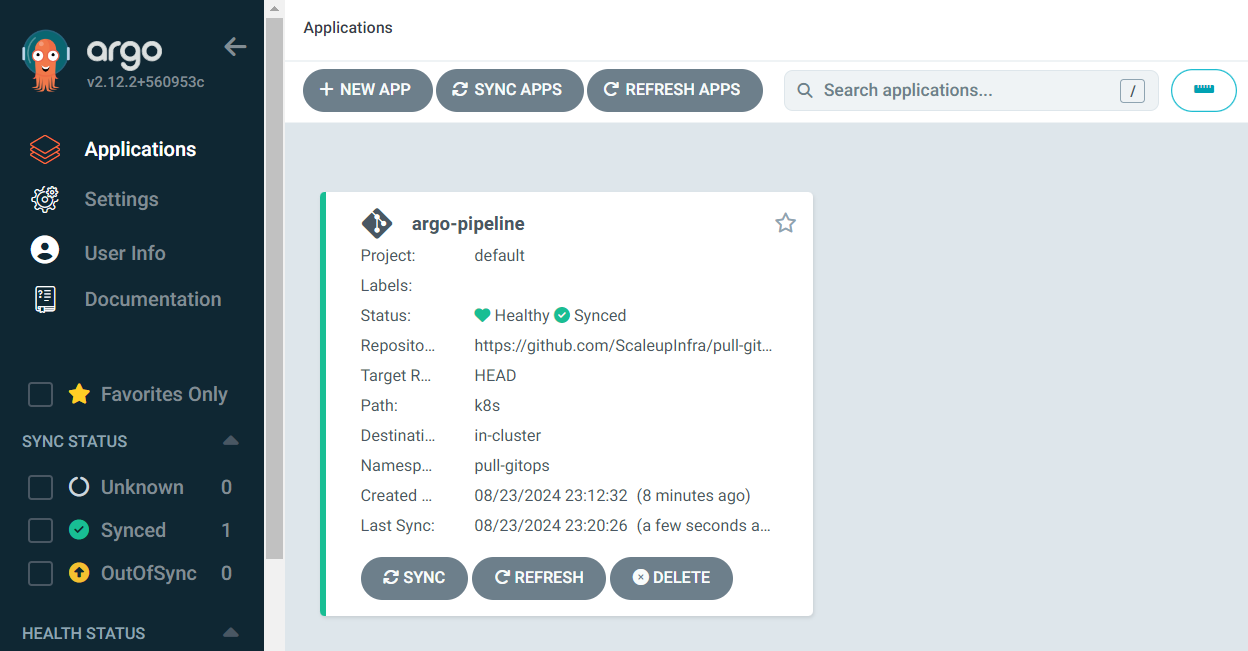
Get the external IP of the “pull-svc” service created on the cluster to verify the application deployment.

Enter the external IP of the service in the browser with the port to verify the application.

Now that we have implemented both the GitOps approaches, let us summarize how they differ, when to use the pull approach, and when to use the push approach.
Push vs. Pull-based GitOps
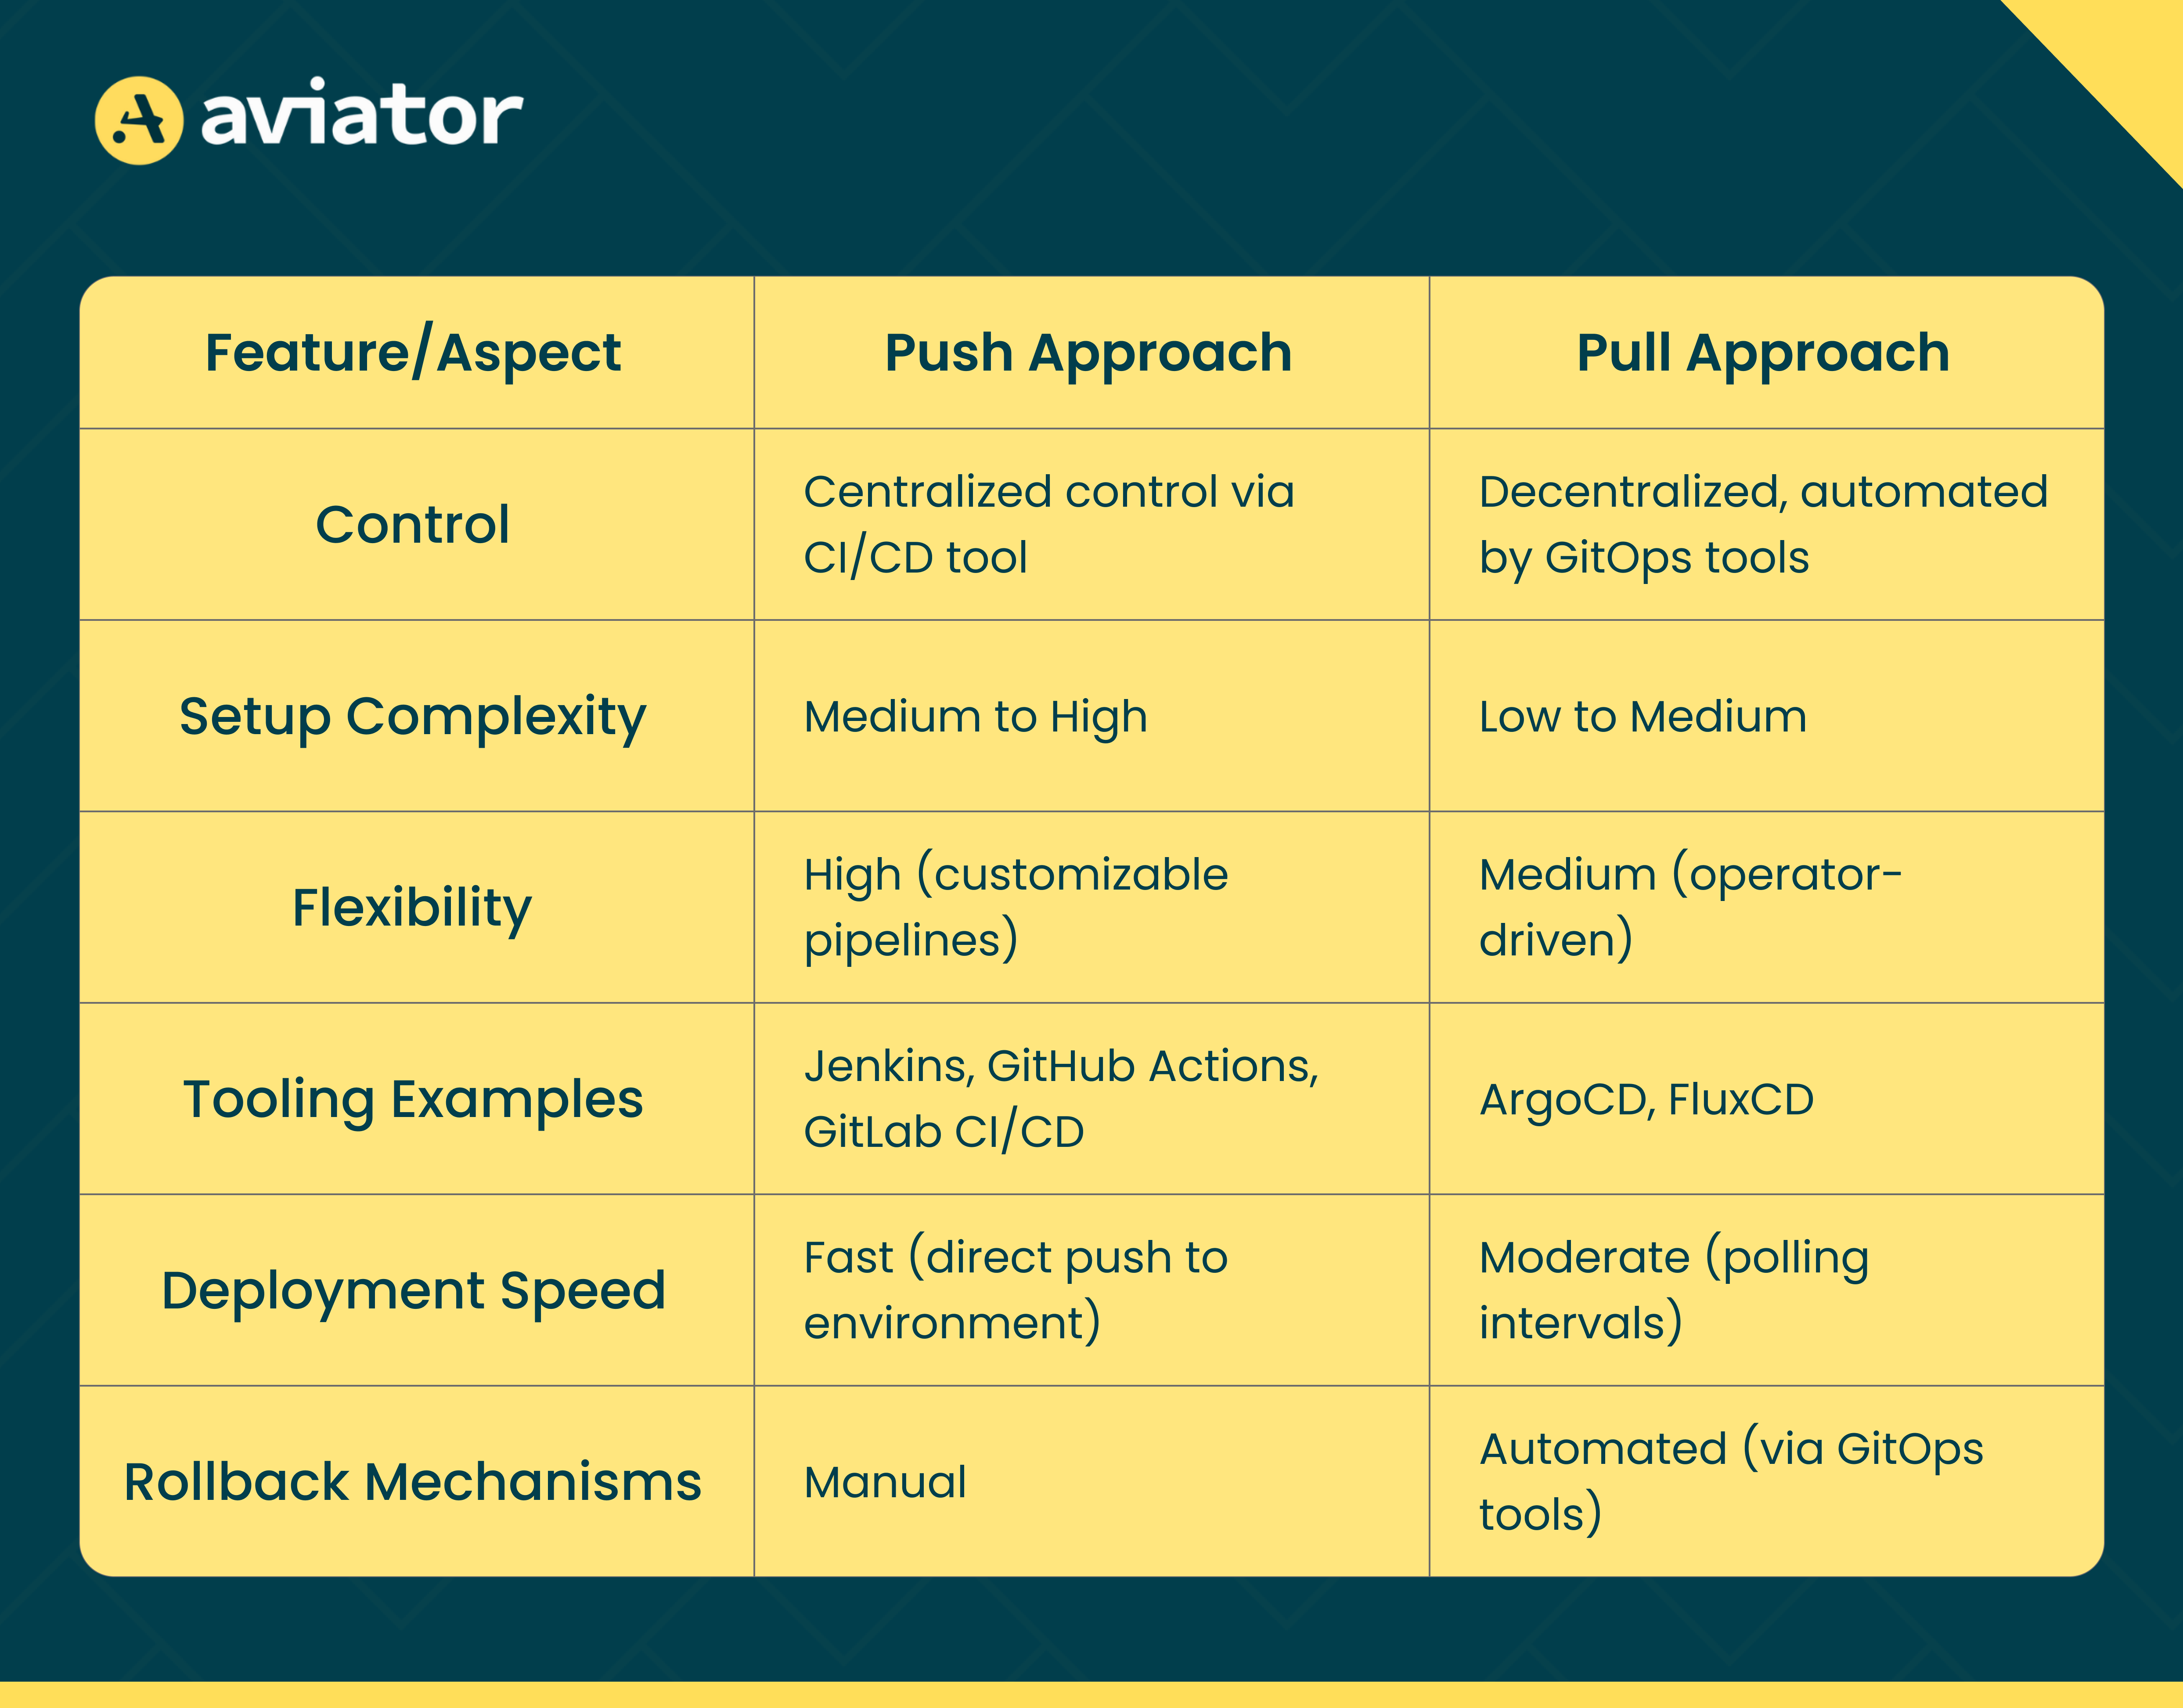
The push and pull approaches in GitOps differ in control, setup complexity, and deployment speed. The push approach offers centralized control through CI/CD tools, allowing for high flexibility with customizable pipelines but requiring a more complex setup. In contrast, the pull approach uses GitOps tools for decentralized automation, providing a more straightforward setup and automated rollbacks but with moderate deployment speed due to polling intervals.
When to Use the Push Approach
- Greater Control: Ideal if you need complex build and test processes or have specific requirements for deployment order.
- Existing CI/CD Investments: If your team already uses CI/CD tools like Jenkins or GitHub Actions, leveraging these tools for GitOps can streamline the process.
When to Use the Pull Approach
- Hands-off approach: Pull-based is a more hands-off approach where the deployment is automated and managed by GitOps tools.
- Kubernetes-native environments: Pull-based tools like ArgoCD are explicitly designed for Kubernetes and can easily handle complex multi-cluster setups.
Conclusion
Both push and pull approaches in GitOps offer unique benefits. The push approach provides granular control, while the pull approach simplifies deployment management. Your choice between these approaches and tools—whether it’s Jenkins vs. GitHub Actions or FluxCD vs. ArgoCD—should align with your team’s workflow and long-term goals.

Frequently Asked Questions
What is GitOps vs DevOps?
DevOps is a broad practice that integrates development and operations for faster, more reliable software delivery. GitOps is a specific implementation of DevOps that uses Git as the single source of truth for infrastructure and application deployments, automating and managing everything via Git.
Why Should I Use GitOps?
GitOps ensures consistency, automates deployments, improves security, and simplifies collaboration by using Git as the source of truth for all changes, making your infrastructure management more reliable and scalable.
What is the Difference Between Push and Pull Model of GitOps?
The difference between the push and pull models in GitOps lies in how deployments are handled. In the push model, CI/CD tools like Jenkins or GitHub Actions actively push changes from the Git repository to the environment. In the pull model, an operator within the environment, such as ArgoCD or FluxCD, continuously monitors the Git repository and pulls changes as they are detected, automatically applying them to the environment.
Is ArgoCD Push or Pull?
ArgoCD is a pull-based GitOps tool that continuously pulls changes from a Git repository and applies them to your Kubernetes environment.

